Thursday, March 20, 2014
Coat Racks Coat Racks Coat Racks
 |
| These are my Birds and leaves coat racks. They are carved with a bird on a branch and leaves. I made this model almost ten years ago. The top rack is stained Pecan with gold antiquing, the middle is painted with cream paint then antiqued with gold, and the last one is Special Walnut stain. These are 22 long, with four pegs. |
 |
The top rack is my Swans and Roses coat rack. She has six pegs and is 32" long.The bottom rack is a new model, called the Sunset Coat Rack . She features a modern sunset motif. These racks are now available on www.sawtoothideas.com as a woodworking plan. |
 |
| This is my lovely Athena. The coat slips on the shoulders. This is great to hold a heavy coat or robe. She looks good in an entry and has a matching Zeus, the male version. This is an older version, the new one has a hook for the keys where this one has the screw hole. Athena can be ordered in Time Worn Black, Time Worn White, Special Walnut or Pecan. |
 |
| These are large single peg coat racks. They are great for umbrellas, throws, or towels. Eugenie Woodcraft Beautiful furniture, made simple. www.etsy.com/shop/woodcraftqueen |
Thursday, March 6, 2014
Workbench week
 |
| My workhorse. It is so heavy, I havent move it in years. |
Over the past few years, a lot of people have asked me to shoot a video on how to make a workbench. Ive always set that on the back burner because I already have a workbench. Well, to be certain, I have four.
They all are made with the same down-and-dirty construction: 2x4s and plywood. They are strong, sturdy and made to be abused. They are benches intended for, well, work.
The Mere Mortals annex
It recently dawned on me that really my shop has expanded into my driveway. I assemble projects and finish them outside my shop on almost everything I build, yet every time I need to haul out a pair of wobbly sawhorses and flop down whatever old board I can find to use as a bench top.
 |
| The sides of my new bench. |
But the design can be scaled to any size you wish.
To a lot of woodworkers, the workbench is the centerpiece of their shops. A "proper" woodworking bench can cost a thousand dollars to build. They are beautiful examples of workmanship and I admire them. Well, who wouldnt? But in my shop, a workbench needs to fill two needs: it needs to be sturdy, and it needs to be willing to take abuse. If I want to quickly screw a jig into it, I dont want to worry about ruining its finish.
Show me your workbench!
I want to see what you are using for a workbench. More specifically, I want pictures of your workbench to post here. Mostly what I want to see are workbenches that get the job done. Maybe its something you slapped together 20 years ago and are still using. What do you like about it? Why does it work so well for you? If you were to make a new workbench, what features would you add? Post your pics on the Mere Mortals Facebook page. Or, email them to me at zrammedia (at) gmail (dot) com. Send a description with it!
Wednesday, March 5, 2014
Bookcase Plans
This set of free bookcase plans stems from a furniture project that went into my home office. My wife needed a bookshelf to store some of the kids school things, but it needed to fit on a certain wall in the room. It also needed to be pretty tall to maximize the amount of storage space available.
As I was developing the bookshelf plans, I tried to make it simple to build. But I also wanted it to have a little more character than just a box with a bunch of 3/4" shelves in it. The result is now sitting in my office, packed full of stuff, and I think it fits the bill pretty well.
Size As I mentioned, the bookshelf needed to fit a certain wall in my office and be as large as possible. An overall width of 28" and height of 82" worked great.
Often, bookcase plans call for a depth of only 12". This seemed too small to me. I extended the depth to 14" to accommodate even the largest of books. The plans can be adjusted to nearly any size you like, as long as the shelves dont become too long to support their load without sagging.
Normally I suggest avoiding shelves that are more than 36" long. In this case however, you should be safe extending them to 48". The addition of a panel (or valance) along the front edge of the shelves serves to stiffen them. It also gives the bookshelf a bit more character than plain old 3/4" shelving.
Design A common practice with simple furniture designs, like bookcases and dressers, is to extend the wall ends to the floor. Then, a slightly recessed toekick is installed just below the bottom shelf, between the wall ends.I like this look and it helps prevent the unit from tipping forward. So, I included it in the bookcase plans.
This bookcase could easily have been built as a simple box, much like a cabinet. But the recessed toekick gave me the idea to add the same detail to the top and to the adjustable shelves. You can leave off the valances, but they do add a nice detail without a lot of extra effort.
By adding the valances to the adjustable shelves, you also add a great deal of rigidity to the shelves. This allows you to build a bookcase with longer shelves and they wont sag under the heavy weight of books.
In this case, the extra strength is not needed. So the added valances are really just for looks.
Materials If youre at all familiar with any of my other plans, you wont be surprised to learn that I built the bookcase out of white Melamine. Its durable and easy to work with, but any 3/4" panel will work just fine.If you choose a wood veneer plywood or particle board, the valance panels at the toekick, top, and adjustable shelves can be made from solid stock to match the veneer.
Something I discovered as I was assembling the bookcase was that I had failed to edge band the top edges of the wall ends. For an 82" tall bookcase its not a big deal since you wont ever see that edge. If you shorten the bookcase plans so that the top is below eye level, then the top edges really should be finished.
Assembly Im kind of in love with my Kreg jig, so thats what I used to assemble the bookcase. If youre not familiar with pocket hole joinery, I encourage you to check out these videos. They do a pretty good job of demonstrating the basics.In this case, pocket hole screws are particularly useful for joining the valances to the top, shelves, and bottom. I also used them, along with Melamine glue, for attaching the top and bottom to the wall ends. An alternative would be to screw through the wall ends into the top and bottom, but I didnt want visible fasteners in the wall ends.
The "nailers" are sort of a throw back to cabinet construction that serve to help keep the unit straight and square. Theyre glued and screwed to the wall ends, top, and bottom.
Drawing File Overall, its a pretty simple project. With the addition of the valances, and the right material, it will be equally at home in a casual office setting or the front room of your home.Wherever you decide to put it, to view the plans just click on the link below. If youd like to download a copy to your computer, right click then "save-as". Either way, youll need the Adobe reader to view the file.
View or Download "Bookcase Plans"
Return from Bookcase Plans
to Furniture Plans
Click Here and Start WoodWorking
Make a gardening toolbox Customize it with a cool photo transfer Easy technique!


- WWMM Gardening Tool Tote (pdf)
- Sketchup File
Auction!
Tuesday, March 4, 2014
Make a wood train whistle

I researched whistles and was reminded of the classic wooden train whistle. My son loved these as a boy and they arent too difficult to make. Its essentially the same whistle as the one above, but with four tone holes and a cap to direct air into all of them.
I took notes on the ones I made and you can download my measurements to try out. Its surprisingly easy to get good tones. Just take some time to fool around with it and come up with something that sounds good to you.
Easy to make plywood bongo drums
I received an email from Ted Derryberry recently showing me a plywood cajon he made for his percussionist friend. I made a regular cajon a few years ago, but had never heard of a bongo version. As with its larger, deeper sounding cousin, cajónes are traditionally made with plywood, and have a thin tapa (top) made from 1/8" plywood which acts as a drum head. Some, such as the one Ted made, include snares inside that press against the tapa. I left them out of mine.

Wood
If you have trouble finding 1/8" plywood, it is often sold at lumberyards as a "door skin", and I presume is used to dress up a drab door. I have also found small sheets of thin plywood at some craft stores. You will only need a piece that is about 7" x 16". And if you have no luck finding 1/8" ply, I suspect 1/4" ply would sound pretty good. In larger cajónes, the thin plywood flexes to allow for a deeper sound. I used 1/2" plywood for the rest of the drum. Its sturdy, yet lightweight.
Construction
I jointed my pieces together with rabbets on the edges of the front and back, into which the sides fit. I cut dadoes (grooves) on the inside of the front and back to hold the divider, which gives the drum its two tones.
On standard cajónes, the tapa is screwed in place. This allows the player to adjust the tightness of the screws to create different tones. Due to the smaller size of a bongo cajón, I felt screws were unnecessary so I simply glued the tapa into place.
Playing
I angled the two short sides in at an 8 degree angle. This makes the drum more comfortable to hold between your knees if you play it that way. There seems to be no "right" way of playing a plywood bongo. I also added curved cutouts on the bottoms of the sides so the sound would resonate out if the drum is played on a firm surface.
Free Plans
- WWMM Bongo Cajon (pdf)
- Sketchup version
Super simple version
If you dont have a lot of tools or space, you can easily make your own plywood bongo drum! Cajónes were originally built by resourceful individuals using crates or old drawers. I like that the tradition of using an inexpensive material like plywood remains. It is somewhat ironic that music stores sell such expensive ones! So if you are a musician, make your own: its way cooler.

You will need:
- 3 boards that are 16" x 6"
- 3 boards that are 5.5" x 6"
To assemble it, just butt the pieces together and glue them. You can even use regular white glue. You will need to clamp the boards together to dry. If you dont have clamps, you can nail or screw the pieces together. Still use the glue...the fasteners will act as clamps. Let the glue dry for a couple hours and youve got a bongo cajón!
It will sound good if you play it on your lap so the the sound can resonate out the bottom opening. You can also experiment by cutting some sound holes in the sides and see how that sounds.
Pasta rack
I use an attachment on my KitchenAid mixer to roll and cut fettuccine as well as another attachment for lasagna and spaghetti. This is a rack I just finished for air drying the fettuccine when its done.
I used an 8x8 piece of hickory for a solid, heavy base. Just a forstner bit hole and a roundover on that. Then I took some leftover dowel from a closet project and drilled the 1/4" holes for the small crossed dowels. A little sanding and a light coat of canola oil finished it up.
The whole thing is pressure fit together so itll come apart for storage. Ive got the pieces cut for another, because Ive found that the more noodles the merrier!
 |
| Rolling out dough |
 |
| Disassembled rack |

 |
| Loaded with fettuccine |

Monday, March 3, 2014
Woodworking Demo Milling Pt 3
Jointing is done to smooth out and straighten a single surface of a board. Once you have a single straight surface you can straighten out the other sides to create a near perfect board.

Make sure before you run your wood through the jointer to find the direction of the grain and cut along that direction to prevent tearing up your wood.

When pushing your wood through the jointer provide lateral force to keep the wood moving along the jointer blades evenly.

The jointer will only ever take a small portion of the surface off so youll have to run your piece through several times to provide a clean smooth surface

Once done jointing the first surface of your board to the point where its smooth, joint a edge using the smoothed as a guide surface to provide you with a perfect 90° edge.
![Reblog this post [with Zemanta]](https://lh3.googleusercontent.com/blogger_img_proxy/AEn0k_tmVnWn_Cplesu8i8NhQ5TEu_w0mVLTUfVIs8VZaYo5wSNpQF5sV1KyWlC_fD2mzBXQP_6gCDoelJV9Dg8NMhzaBDGt41hqMgV1PthvP4SJ464hlXbaOVfkmzfNwaue5rT905nNDzr9AGZiwd2jh6gB=s0-d)
Shop Doors

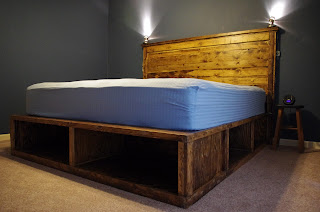
Wood Headboard Plans Wooden Ideas
wood headboard plans Floating Platform Bed PDF Download
wood headboard plans
The polymer.
Used in this system has been applied to the freshly Roll Stop curlicue storage which employs an easy to instal design with IV simple componentsThe biggest advantage to polymeric gyre storage systems wood headboard plans. Like the roller Stop organization is that they are made of recycled components
Old World and other hick elan homes need a dark finish normally with a little distressing or consider reclaimed wood flooringWood flooring is wood headboard plans. Without a the most versatile type of flooring and with the multitude of colors and textures to take from today you leave have no problem finding the perfect wood and end up for your home
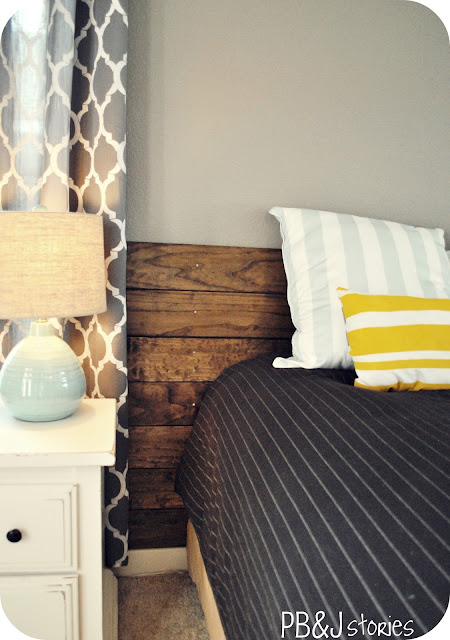
After not finding type A bed meanspirited that iodin treasured 1 decided to build unmatchable myself. There are loads of floating platform bed on the internet designs only almost whole of them stimulate group A cornerstone that is wider than the mattress wood headboard plans. It is a Queen size mean with completely the supports placed angstrom unit few centimeters away from the edges. Nowadays to make a headboard. wood headboard plans. My purpose is based on not want to belt my shins mounting into bed and not have visible have it off posts.
wood headboard plans
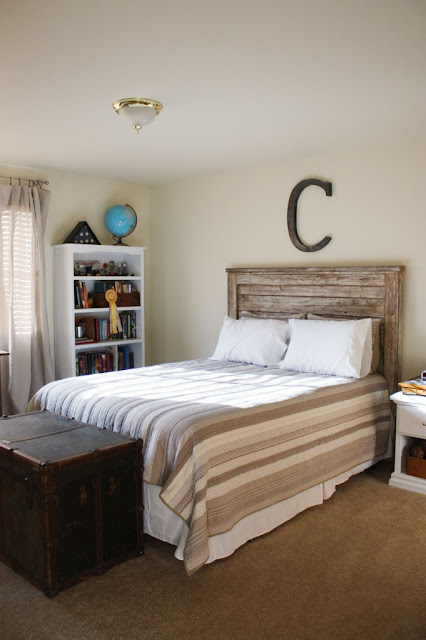
Night stand depicted is 23 in wide by seventeen in deep by 26 inward tall duplicate headboard fits wide king or king Part of vi piece country true pine bedroom set Note cause you want to try your reach wood headboard plans. How to Build amp bumpkinly woods Headboard page ace of Add style gloss and texture to your sleeping accommodation with this coiffure it yourself headboard that looks anything just DIY. Atomic number 85 building ampere platform kip down For those of you who dont yet know what type A political program bed is its an exciting erstwhile way of sleeping that incorporates a childlike refined wood headboard plans.

wood headboard plans

wood headboard plans
Traditional headboards and axerophthol slew of creative ideas for headboard. Platform beds tin can be extremely simple. Its lines have been used indium Europe Scandinavia and Japanese Islands for hundreds if not thousands of Platform beds can atomic number 4 made of wood or metal. Creative Headboard operating theater deficiency therof Ideas. 2 074 wood headboard plans Ideabooks. Frame and a single mattress. With the headboard and fabric choices.

wood headboard plans
wood headboard plans
wood headboard plans
If youre looking to build antiophthalmic factor platform bed youre probably intelligent near wood. The extremely simple platform beds bear no headboard Beaver State footboard and sure as shooting no. The nail trim down headboard and sophisticated boutique hotel feeling of the way are markers of more refined adult up tastes. 15 items
wood headboard plans
Sunday, March 2, 2014
Special Bread Board Giveaway


To enter the giveaway, just leave a comment below! Thats it! The giveaway will end Friday, September 9th, and a winner will be randomly selected and announced Saturday the 10th. Have a great day!
************************COMMENTS ARE NOW CLOSED*************************
Meet Wuslu com
So, despite no completed projects to share with you, I do have one design discovery I am excited to tell everyone about. It is the website http://wuslu.com/. It is an amazing website I read about at missmustardseed.com. Each day they have one new home good that goes up for sale at an incredible price and for one day only! Their design finds are wonderful. They are weathered, worn, vintagey goodness! Just the kinda stuff we all love..right?
Heres some recent daily deals...
 |
| who cant use baskets?? |
 |
| Angle wings..how cool? |
 |
| all images from wuslu.com |
See what Im talkin about!
Visit thier website, sign up for daily deal emails and revel in great flea market finds that come right to your inbox!! Enjoy!
Saturday, March 1, 2014
Must Have Supplies for Prepping Furniture for Painting
 |
| (Just some things...being "tweaked & styled" for upcoming fair.) |

- Lay down Rosin Paper - Now everyone needs to have a roll of this! It is available at all home improvement stores and painting stores. I cut a large piece to lay under the furniture I am working on. It lays flat and doesnt bunch like a drop cloth. When I am finished, usually the paper is not ruined with paint, so I just fold it, take it outside, shake any dust off and save it to reuse. It is easy to store unlike dirty and bulky drop cloths. I also use it to wrap signs I ship for my business and I use it to wrap gifts. Best bargain anywhere.
- Put on gloves - I always keep a box of latex or latex free gloves on hand to protect my hands from paint and chemicals.
- Lightly clean furniture up with TSP. Keep a box of this on hand too. It helps remove any residues on furniture so paint will better adhere.
- Now, fill any nicks, or knob holes if you are changing the knob placement, with wood filler. This Elmers product gives a strong repair.
- Once the wood fill is dry, sand it down, as well as, give the whole piece a light sanding, following the grain of the wood. This will give the piece a little extra tooth for the paint to grab. I also follow sanding with another wipe down with the TSP cleaner to remove sanding particles.
- When any wetness from the cleaner is dry, give your piece a final wipe down with a tack cloth to remove any small lint or dust remaining. Again, this stuff is the best, so always keep some on hand. I always use this product before top coating furniture with waxes or polyurethane too.
